Symptoms:
After cloning snapshot on SAN storage can’t mount the snapshot volume as a datastore to register the VM.
In VCSA Web UI, we were unable to see the existing LUN to add as a datastore. This issue doesn’t appear till ESXi version 6.0, started from version 6.5 to 6.7. This issue isn’t related to the ESXI connectivity to the storage box as the snapshot is detected as a virtual disk under the devices tab.
Purpose:
To mount a datastore from a SAN storage snapshot to clone a VM.
Cause:
You can experience this issue in VMWare ESXi 6.5 and 6.7 probably due to issue with VMWare vSphare Web client.
Resolution:
In case you want to clone a running a VM or to create a VM from a baseline storage volume, you may fail to mount the snapshot as a datastore in ESXi 6.5-6.7.
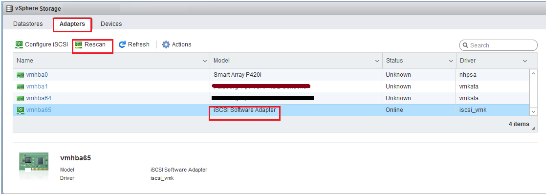
After cloning the volume on the storage and making it online, need to rescan the iSCSi software adapter.
To rescan the adapter :
Launch ESXi web management console and login with root access rights.
Go to Manage>Storage>Adapters>Select iSCSI software adapter>Click rescan

Now go to Datastore tab ideally there should be a new datastore with name snap_xxxxx.
But with the version 6.5 and 6.7, there will not be any new datastore. The new volume will be detected as a disk.
To verify the same, go to
Manage>Storage>devices, the total no of disk must have been increased by one.
Workaround to mount the volume
1. Log in through SSH client (putty) and run below command.
By default SSH disable on ESXi server. Follow these steps to enable SSH or skip this if already enabled.
To enable SSH refer our blog and follow the step 4.
https://www.hex64.net/how-to-fix-corrupt-iscsi-adapter-in-vmware-esxi/
2. Use below command
esxcfg-volume -l

3. Copy the volume label, which is the text before /volume name.
4. Run command
esxcfg-volume –r <volume label>![]()
5. Launch ESXi web client and go to
Manage>Storage>datastore
Now you can see the snapshot volume mounted as a datastore.

6. Rename the snap datastore and register the VM.
7. To register the VM, click on Register a VM option.

8. On the new window click the snapshot then the folder containing Virtual Machine files, finally select the .vmx file and click register.

9. This will add a new VM same as in the snapshot volume, ready for use.


