
How To Increase The Volume Size In EC2 (Windows)
1. Login on AWS cloud console.
2. Click on Services > Compute > EC2 > EC2 Dashboard.
3. On the EC2 dashboard, click on Instance.
4. Select the instance.

5. Go to the Storage tab.

6. Scroll down the Pane and click on Volume ID.

7. Select the Volume and click on Action.
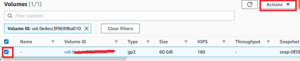
8. Once you click on Action, a drop-down menu list will appear, select the option Modify Volume.

9. Increase the Volume size as per your requirement and click on Modify.

10. Now, login to the EC2 instance.
11. Open Run command prompt, type diskmgmt.msc, and press Enter.
12. Click on Action, select the Refresh. Now, you will see the unallocated space.

13. Right-click on Volume which you want to expand, and then choose the option Extend Volume and
click on Next.

14. Increase the Volume size (MB) as per your requirement. Click on Next and then Finish the setup.