As a result of augmentations to vCenter Server Appliance (VCSA) version 6.7, especially, its performance and vSphere Client, you may seek to think over upgrading your VCSA first rather than later. Here’s how.
vSphere 6.7, released on 17th April 2018, introduces new highlights in the vCenter Server Appliance (VCSA). In this blog, we’ll explain to you, how to upgrade VCSA from 6.5 to 6.7. This build has some fixes and upgrade, for more detailed information, go to the release note.
Pre-Upgrading VCSA
Before upgrading my VCSA, check the release notes for any issues that may create troubles within the environment, and then check the below points to make sure that it would work with other products in environment:
- vCenter-ESXi Support Matrix
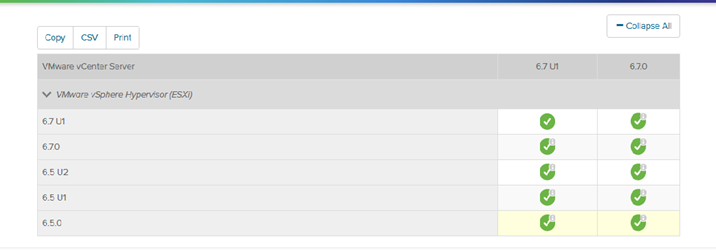
- Refer the below table to know your current VCSA Version and plan the upgrade accordingly.
Reference: https://kb.vmware.com/s/article/2143838
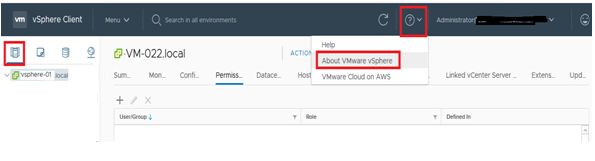
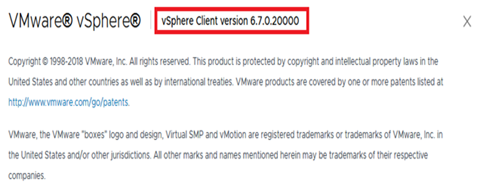
To check your current VCSA version follow the below steps:
✔ Login into ESXi, click on the dropdown arrow and select the option “About VMware vSphere” option.
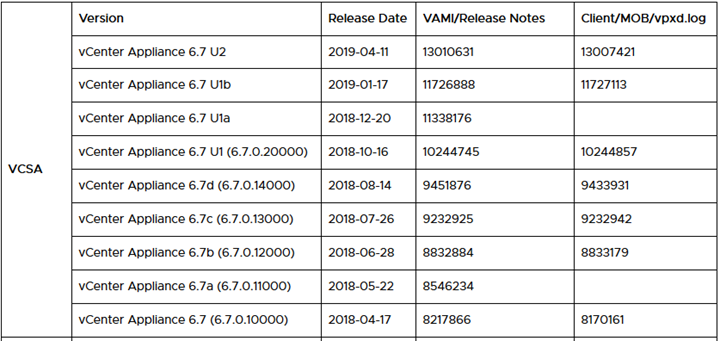
✔ Now you can see the VCSA version as shown in below figure. To find the version, match the build no as in the above table.
● vCenter Upgrade Matrix
Refer this table to identify the upgrade path.
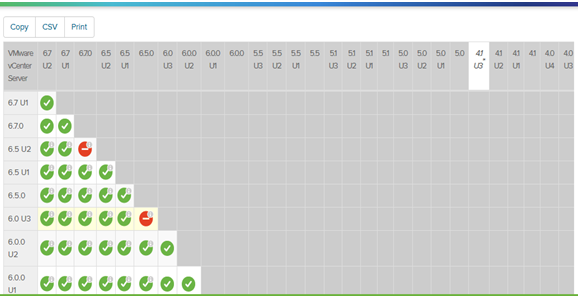
Reference: https://www.vmware.com/resources/compatibility/sim/interop_matrix.php#upgrade&solution=2
If you haven’t downloaded the vCentre yet, you can head on below link,
https://my.vmware.com/group/vmware/details?downloadGroup=VC67U1B&productId=742
I. Login into myvmware account.
II. Click on View and Products, select All products and finger at and click on View and Download Components.
III. Scroll down VMware vSphere 6.7 and one more click to go to download.
IV. Within the download you can see the VCSA and click to download now.
V. Just go through the prompt there and save it to your location on your server.
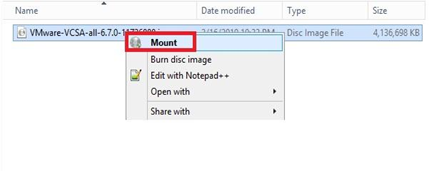
After downloading the ISO,
1. Right click on it and select Mount option.
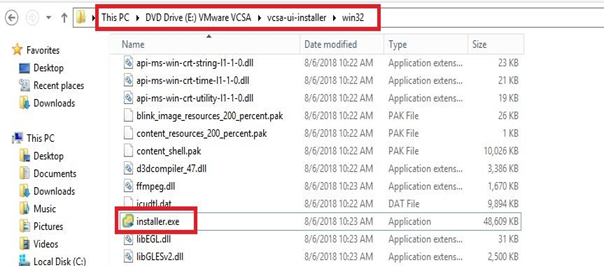
2. Go to vcsa-ui-installer/win32 and double-click the installer.exe file
3. The installer UI displays four different options (Install, Upgrade, Migrate and Restore) as shown in below figure.
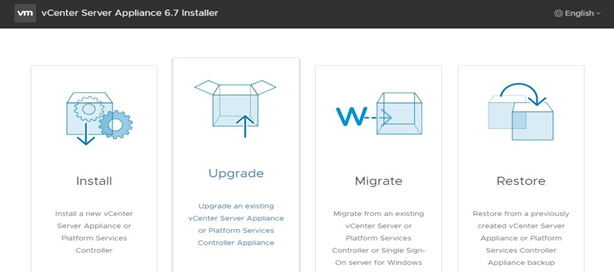
Here we select the option Upgrade.
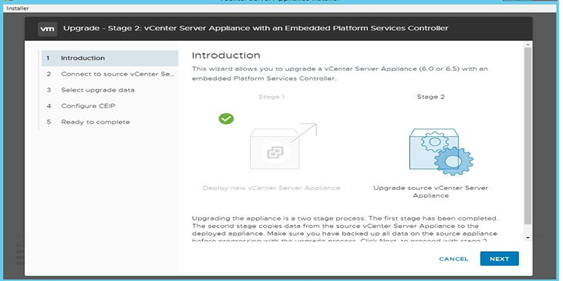
4. Upgrading is broken up into two-stage process: The first stage deploying actual virtual appliance to the target vCenter server or ESXi host; the second stage going through the setup of the data from the source appliance to the deployed appliance.
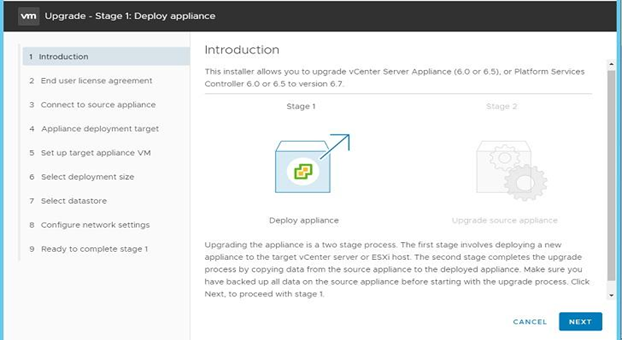
So began with stage first and click Next.
5. Check the license agreement box and click Next.
6. Enter the IP address of the vCenter Server Appliance you wish to upgrade and click to “CONNECT TO SOURCE”.
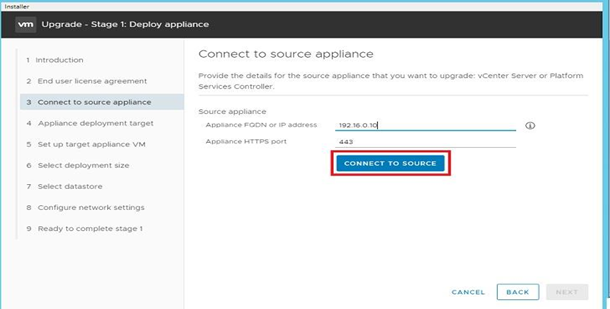
7. Enter in the details of the source appliance, here we can use the FQDN or IP address, also enter the SSO administrator username and password, the root OS password for your original appliance.
8. Input the https port and username/password of the ESXi Host or vCenter Server that is managing the source appliance.

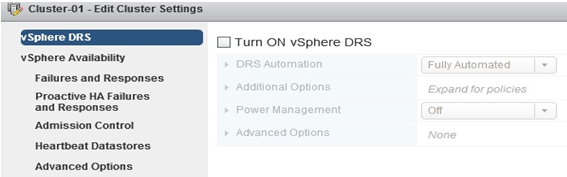
Note: If you want to connect directly to an EXSi host and it is in a DRS cluster. DRS initiated vMotions may occur during the deployment process.
To prevent this DRS should be Disabled or manual. It shouldn’t be in fully automated mode.
✔ Go to the cluster on which ESXi exist> Go to vSphere DRS > Configure > click on Edit.
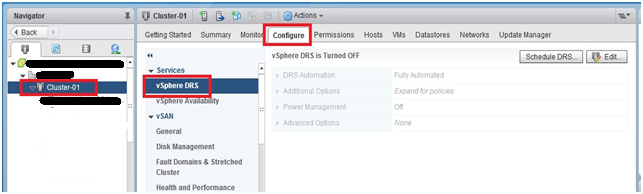
✔ Check the box to Turn ON vSphere DRS and set it on Disabled or manual mode.
A certificate warning pop will be displayed; this is the certificate for your vCenter server click to Yes.
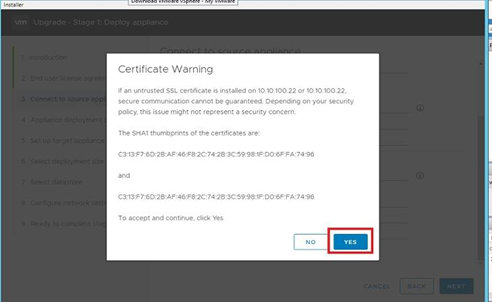
Click to Yes.
Note: If you get issue “Failed to authenticate with the guest operating system using the supplied credentials” during the VCSA upgrade.
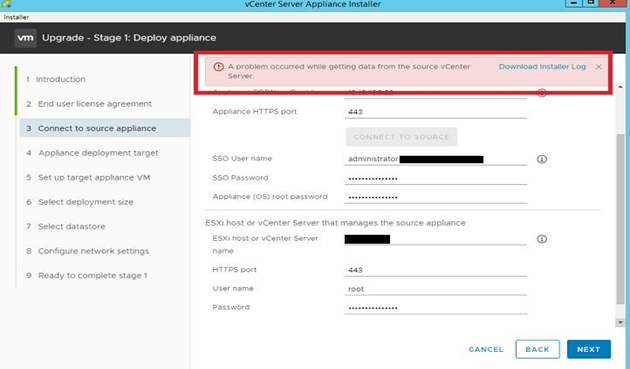
Refer to our blog “ https://www.hex64.net/unable-to-contact-the-source-vcenter-during-vcsa-upgrade/ ”
9. Specify the destination where you want the new appliance to be deployed.
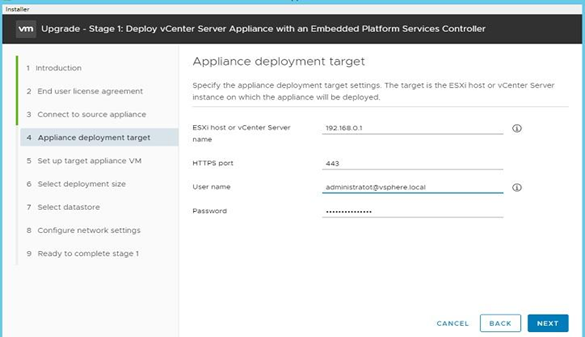
A certificate warning pop will be displayed; you will need to accept the SSL thumbprints.
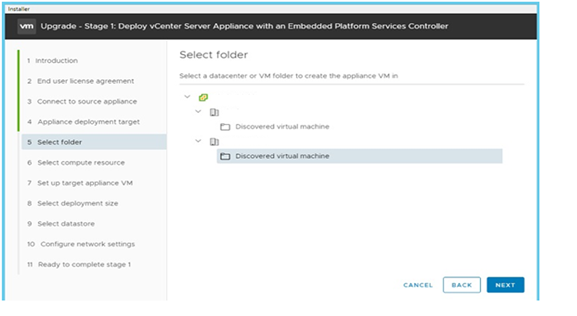
10. Select VM folder you wish the appliance to be deployed in and click to Next.
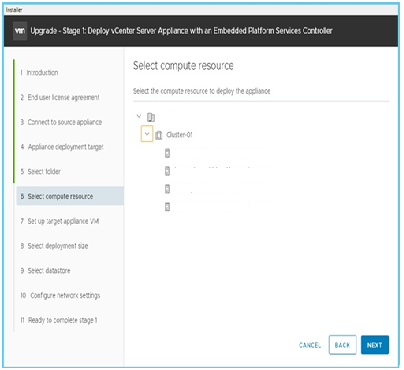
11. Select the compute resource you would like to deploy the appliance to. You can specify a cluster or standalone host and click to next.
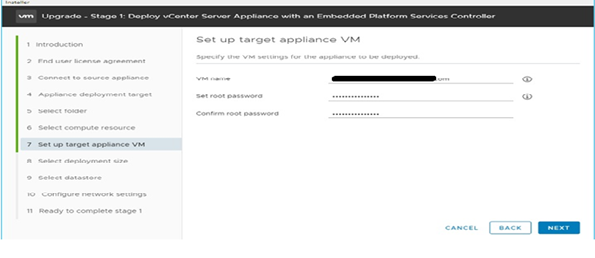
12. Specify the display name for our new appliance in vCenter inventory, it must be unique. We will also set a new root password for the appliance. You do have the option to re-use the same password.
And click to Next.
13. Then you will be asked for size of VCSA you want to deploy. Choose a deployment size and storage size for our new appliance.
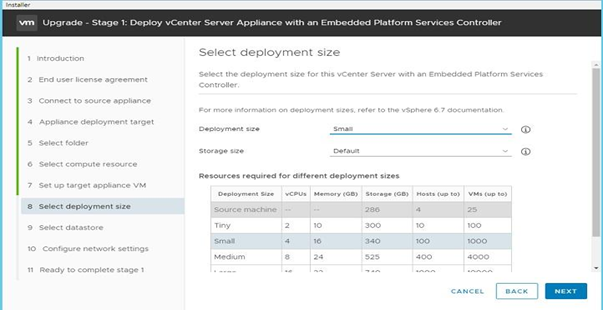
Note: If you plan to use vCenter High Availability a deployment size of Small or larger is required. vCenter High Availability is not supported on Tiny deployments.
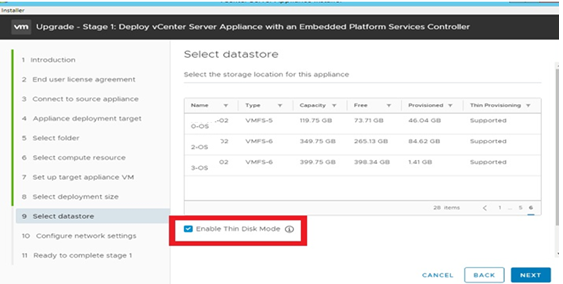
14. Specify the storage location for the new appliance and if you would like it to be thin provisioned you will check the box.
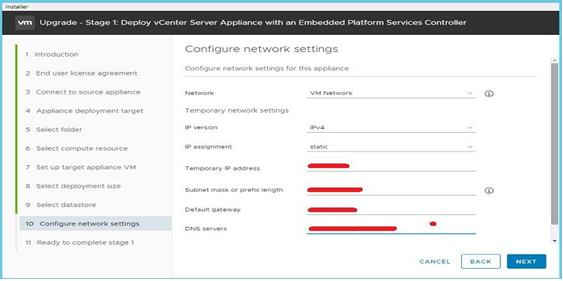
15. Specify a VM network and IP that will be used for the temporary network. This is only used during the export and import process. Once the upgrade is complete, the IP will become unused.
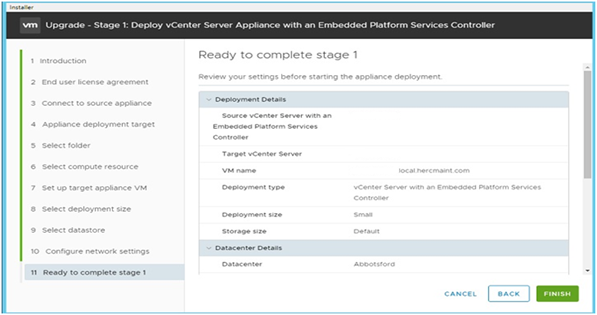
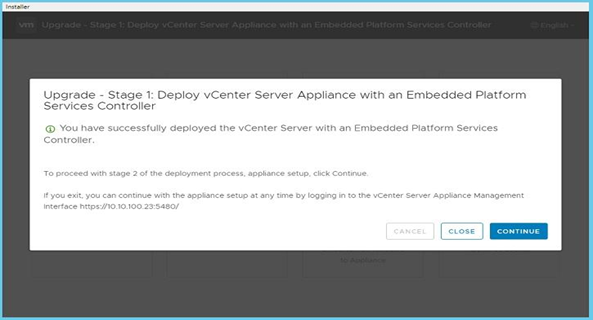
16. Validate all the information you entered is complete and click to Finish to finalize stage 1 of the upgrade process.
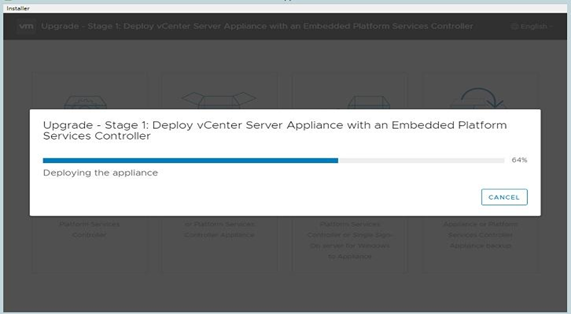
Then a screen will be displayed indicating that the deployment has been started.
17. Once the stage 1 will be completed then click to Continue to move on stage 2.
Stage 2:
In second stage we will start the process of migrating data from source appliance to the new appliance.
Pre-upgrade checks will run, and will inform you if you have any errors or warnings.
If any errors or warnings occur, you can review the VMware KB or vSphere documentation site for more information.

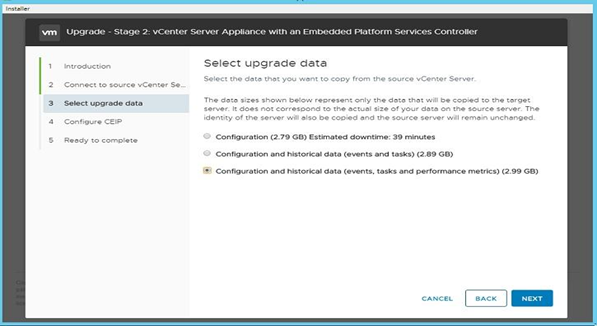
During the installation, you will be asked for what historical data you want to import from the existing VCSA.
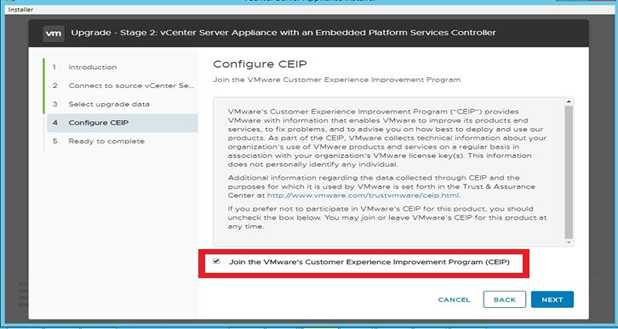
If you want to join the Customer Experience Improvement Program (CEIP) then check the box. CEIP helps with proactive support and metrics.
The last step in the wizard is to verify the information you have entered and that the existing VCSA have been backed up.
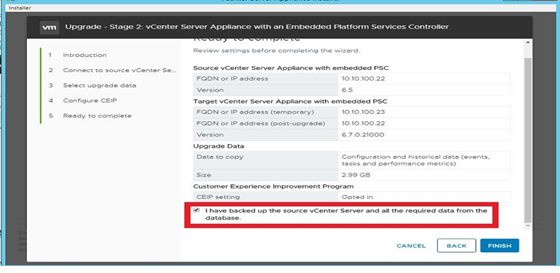
Check the box and hit to the Finish button to complete the stage 2.
A prompt window will appear with warning and it will show you that during this process the source vCenter Server appliance will be shutdown.
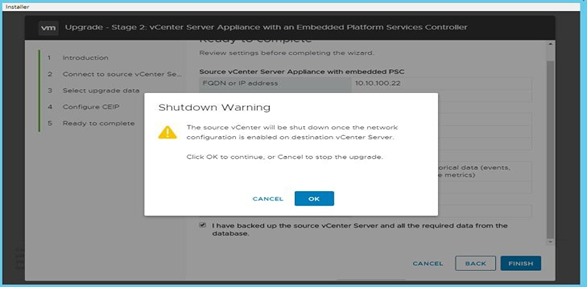
Click to Ok.
After appliance reboot if everything goes good, then you can browse the appliance IP to access the vCentre.


Working for a project to upgrading vCenter server 6.5 to 6.7 this blog really us improve our troubleshoot activities. Thank you for publishing this awesome article.