After the complete installation of VMware ESXi onto a server, you will probably want to give it a static IP address rather than using DHCP.
There are two ways through which you can configure ESXi with a static IP:
Via the server console management screen.
Via the web GUI interface.
Set Static IP for ESXi via Console management screen:
1. First of all, get to the main screen on VMware ESXi server that tells you where to download the tools to manage the host (till ver6.0) or the web management url (for ver6.5 & above).
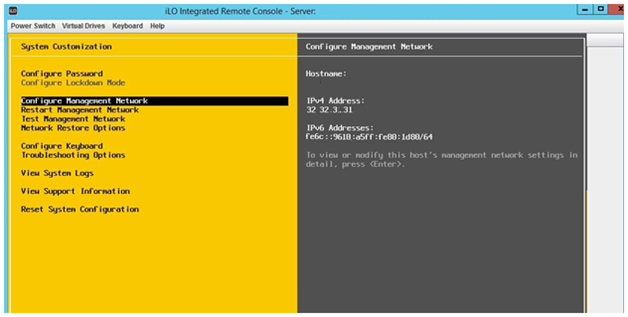
On this screen, press the F2 key to get the system customization screen.
2. Login into the VMWare ESXi Server by entering the Login Name and Password.

3. Here, select the Configure Management Network option. On the right-hand side, you can see information about the host name and the current IPv4/IPv6 addresses for the server.
4. Press Enter, you get another screen where you can configure the network adapters, VLANs, DNS, etc. Here we want to set or change the IP so we select the IPv4 or IPv6 configuration option. So, here, I am going to select the IPv4 configuration option and then press Enter.
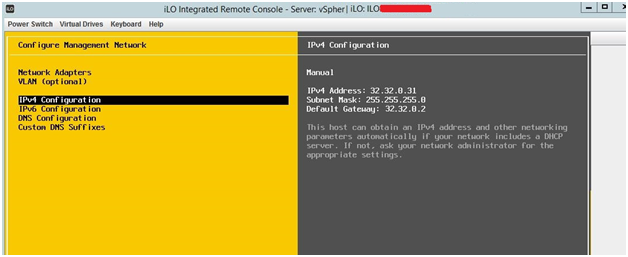
5. On the IPv4 Configuration screen, select the Set static IPv4 address and network configuration option and then press the space bar. When you press the space bar, all the IPv4 configuration lines become editable. Type in the new IP address, subnet mask and default gateway that you would like to use.
Set Static IP for ESXi via the web GUI interface:
If you do not have the physical access or remote bios mgmt. tool to the host, you can use the vSphere Web Client to configure static IP settings.
Download Our Services Brochure
## There are high chances of losing access, if you are making other additional changes with IP, like gateway (accessed from different routed network) or VLAN. Based on our experience, ESXi server registers only a single change at a time.
So use this option only if you are accessing the ESXi server from the same subnet and no change for the VLAN is required.
1. Log in to the vCenter Server from the vSphere Web Client.
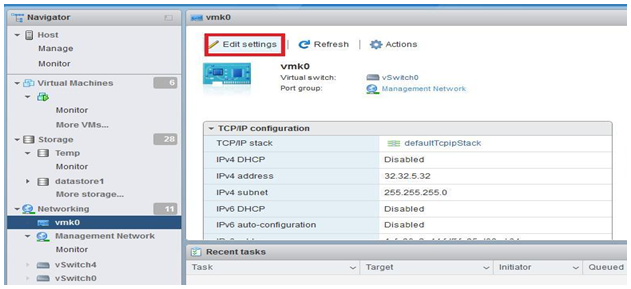
2. Select the Host from inventory >On manage tab, select Networking>VMkernel NICs
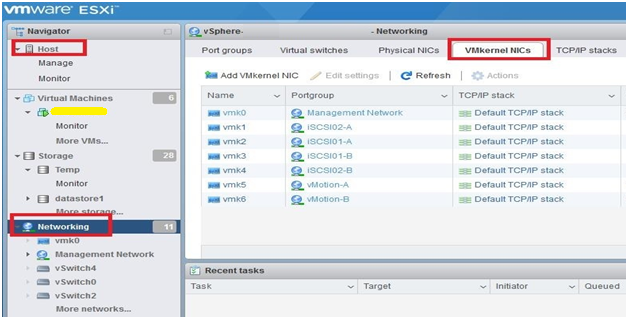
3. Here you can see the virtual switch of the management network, the VLAN ID and how many active ports are being used. At the bottom, in the vSwitch Topology box, you get the virtual name for the physical port being used on the server. In my case, it’s vmk0. Click on that to edit it.
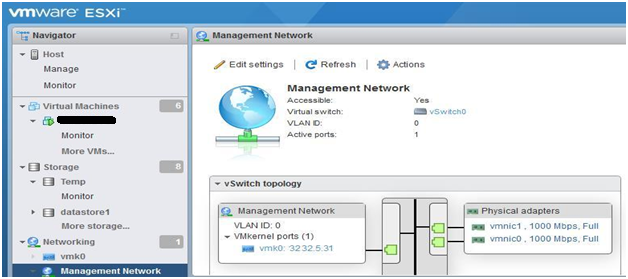
4. Here you should see the entire current TCP/IP configuration, which you can change by clicking the Edit settings. Expand the IPv4 section.
5. Choose from DHCP or Static, and then type in the new IP address and subnet mask if you chose the latter option.
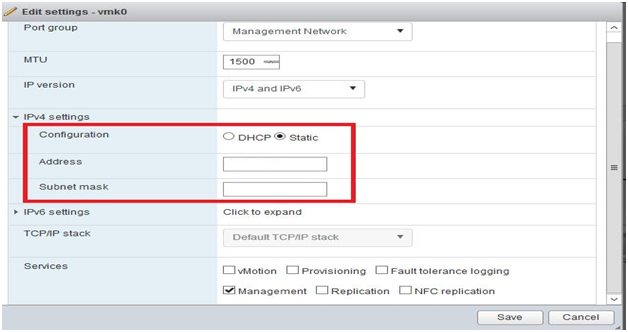
6. That’s about it! You’ll be asked to restart the management network, which will update the IP info. Obviously, if you are doing this over the web interface, your connection to the server will be disconnected. You’ll need to type in the new IP address to connect.


