Symptoms:
When using the VMXNET3 driver on ESXi 6.x, you see significant packet discards during the periods of very high traffic bursts on a VM having SAN volume connected by using a Windows iSCSI initiator. Just to be sure, launch the command prompt with the admin rights and fire command netstat –e.
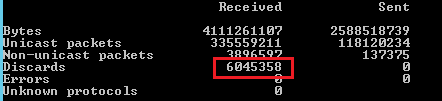
If your output contains a high no. of ingress discards that means the VM is simply dropping the packets due to unavailability of the resources.
Purpose:
To fix this issue of significant ingress packet discard during high traffic bursts, make sure that there isn’t any traffic filtering configured (like Firewall, Antivirus etc.). Once this possibility is overcome, either increase the hardware resources on the VM (Only if the resource utilization is above 90% during the packet discard) or gradually increase the number of Rx buffer in the guest operating system.
Cause:
This error is due to a missing flow control feature for the VMXNET3 of multiple issues. Packet drop is actually an ingress packet discard by VM’s iSCSi interface.
Reason for this discard is the unavailability of resources on the VM to process the ingress packets. This is the reason a packet discard alert is always followed by either high memory or CPU utilization alert.
Verification:
Alerts are for iSCSi interfaces as 9k sized (if Jumbo frame is enabled) packets are being received on this interface at a high transfer rate, that requires system resources and if resources are unavailable, interface starts discarding packets.
With flow control enabled on all the devices, this discard should not appear. Make sure the flow control is enabled on all the intermediate devices like SAN, iSCSI switches, and others.
To verify Flow control on HP switch:
Connect switch using SSH client and put command
show interfaces brief
The output shouldn’t have “off” being displayed under flow control.
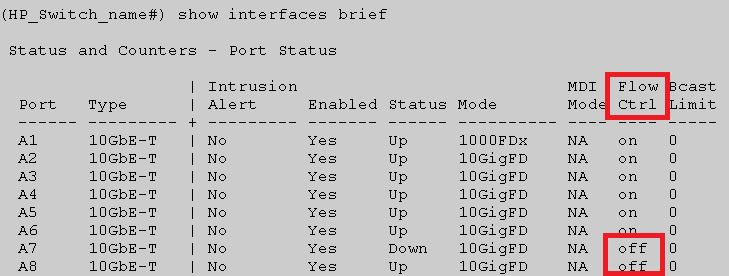
In case flow control isn’t enabled use below command to do so,
interface <PORT-LIST> flow-control
To verify Flow control on ESXi:
Connect switch using SSH client and put command
esxcli network nic get -n <interface name>
The output shouldn’t have “false” being displayed under flow control.
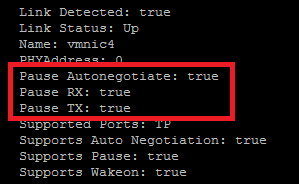
In case the flow control isn’t enabled, use the below mentioned command to do so,
To enable auto negotiate for the flow control on all interfaces, type the below mentioned command
esxcli network nic pauseParams set –a
To enable flow control on a specific interface, type the below mentioned command
esxcli network nic pauseParams set -n <interface name>-r 1 -t 1
##Replace interface name with your required interface name
## r=Rx,t=Tx,1=enable(0=disable)
Note: In case you are using HPE custom ISO image for ESXi 6.5 flow control command will not work.
Follow this Url to fix flow control issue on custom HPE image.
https://www.hex64.net/fail-to-enable-flow-control-autoneg-on-esxi-6-5/
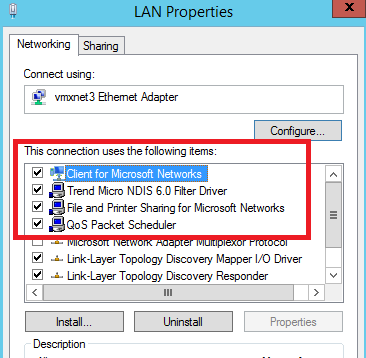
To verify Flow control on VM:
Open Run window and type ncpa.cpl.
Right click on desired interface and click Properties.
Go to networking tab and click on Configure.

On the next window, go to tab Advanced.
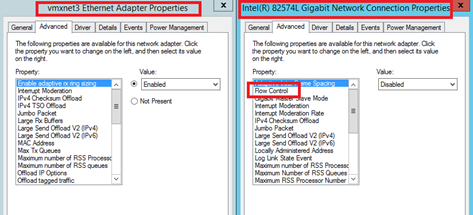
There should be an option of flow control setting over there. But there isn’t any Flow Control option for the VMXNET3 adapter.
As discussed with VMWare, the VMXNET3 Ethernet adapter doesn’t have a flow control feature and they have no plans to incorporate the same in the near future. Whereas Flow control settings is available for E1000e ethernet adapter.

Workaround:
As discussed with VMWare to workaround this issue, make sure that there is no occurrence of traffic filtering (like Firewall, Antivirus etc.). After eliminating this possibility, gradually increase the number of buffers in the guest operating system (for iSCSI interface, check notes).
To decrease burst traffic drops in Windows Buffer Settings:
1. Click Start > Control Panel > Device Manager.
2. Right-click vmxnet3 and click Properties.
3. Click the Advanced tab.
4. Click Small Rx Buffers and increase the value. The default value is 512 and the maximum is 8192.
5. Click Rx Ring #1 Size and increase the value. The default value is 1024 and the maximum is 4096.
Notes:
- These changes will happen on the fly, so no reboot is required. However, any applications sensitive to TCP session interruption can fail and have to be restarted. This applies to RDP, so it is superior to do this work in a console window.
- This issue is seen in the Windows guest operating system with a VMXNET3 vNIC. It can take place with versions besides 2008 R2.
- It is important to boost the value of Small Rx Buffers and Rx Ring #1 slowly to avoid drastically increasing the memory overhead on the host and possibly causing performance issues if resources are close to capacity.
- If this issue occurs on only 2-3 virtual machines, set the value of Small Rx Buffers and Rx Ring #1 to the maximum value. Monitor virtual machine performance to see if this resolves the issue.
- The Small Rx Buffers and Rx Ring #1 variables affect non-jumbo frame traffic only on the adapter.
Additional Suggetions:
However, you can also disable few services on iSCSi interface which isn’t required.