Concern:
Auto-unlock of Bitlocker encrypted VM is not possible till ESXi 6.5. This is due to the fact that there is no option for the virtual/shared TPM to virtualize the hardware TPM and use it on the VM.
Solution Snapshot:
First enable the Bitlocker encryption without TPM for OS or non OS drive from the group policy.
Create a virtual floppy disk and attach it to the VM.
Encrypt the OS drive and save the bitlocker unlock key on the floppy drive.
Enable Bitlocker encryption without TPM for OS or non OS drive from group policy
1. Type “gpedit.msc” in the Start Search box.
2. Click on Computer Configuration>>click Administrative Templates>>click Windows Components>>click on Bitlocker Drive Encryption.
3. Select “Require additional authentication at startup” and double click on it.
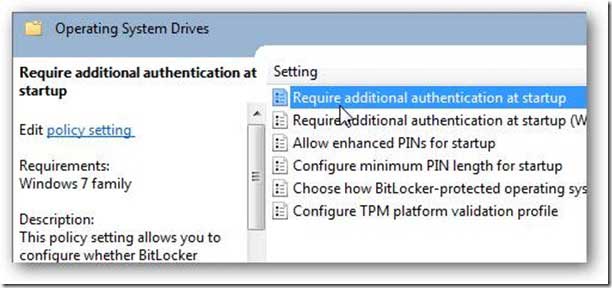
4. Enable the feature and check the box next to “Allow BitLocker without a compatible TPM”, click Apply and Ok, and close out of Local Group Policy Editor.

5. Put a check for “Allow Bitlocker without compatible TPM chip”.
You have changed the policy setting so that you can use a startup key instead of a TPM.
6. Close the Local Group Policy Editor.
Create a Virtual Floppy Disk and Attach it to the VM
1. Open the virtual machine settings editor (VM > Edit Settings) and click Add to start the Add Hardware Wizard.
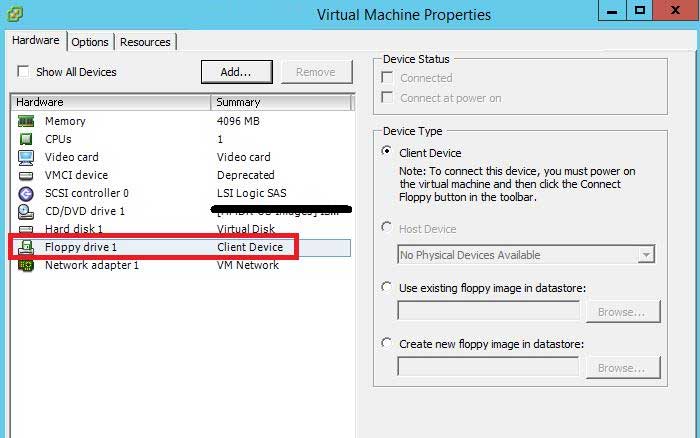
2. Click Floppy Drive, and then click Next.
3. Select the new floppy image file. Click Next.
4. Type the path and filename for the floppy image file you want to use or click Browse to navigate to the file. Click Finish.
Note: By default, only one floppy drive is enabled in the virtual machine’s BIOS. If you are adding a second floppy drive to the virtual machine, click inside the virtual machine window and press F2 as the virtual machine boots to enter the BIOS setup utility. On the main screen, choose Legacy Diskette B: and use the plus (+) and minus (-) keys on the numerical keypad to select the type of floppy drive you want to use. Then press F10 to save your changes and close the BIOS setup utility.
Encrypt OS drive and save the bitlocker unlock key on the floppy drive
1. Login into the VM.
2. Open the command prompt with admin access.
3. Now use the below mentioned command to encrypt the OS drive and saving the unlock key on the floppy drive.
manage-bde -protectors -add C: -startupkey A:
4. To Encrypt the Used space only and save the encryption key on a floppy, use the below command:
manage-bde -on -UsedSpaceOnly C: -startupkey A:
5. Now reboot the machine and auto-unlock should work.


